I got a few things done this weekend before I had to get back on the road. I Installed a new range hood Saturday afternoon. We had a range hood but it was old and the knobs didn't work so it was just useless sitting there above the stove for the last three years. They are not that expensive so I am ashamed that it took me this long to get to it. We looked all over town, well at the two places in town that would have them, and only found white and almond. Our kitchen is crimson, white and gray. Alabama Crimson Tide Colors, so almond is out and white is to bright. What we really wanted was black but that one is hard to find for some reason. So we headed north 18 miles to Greenville, stopped off at the Huddle House and had some lunch then headed to Buchheit's. Wow do we love this place! If I was a farmer I would be in heaven in there. Wait, I am in heaven in there. They had a stainless hood for around a hundred bucks and was pretty easy to put in. Now I will be able to have better pictures when I get to taking them while we are cooking.
That white shelf above the stove has to go though. when you are standing there cooking and you want something from the shelf you have to stoop to get it as the shelf part is too high up. I need one where the shelf is on the bottom of the backing not the top. I thought of hanging this one upside down but then the hearts would be upside down and that would be silly. It will have to do for now.
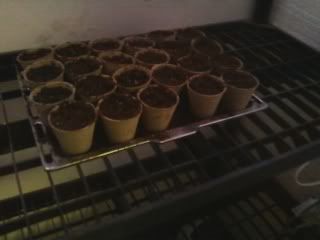
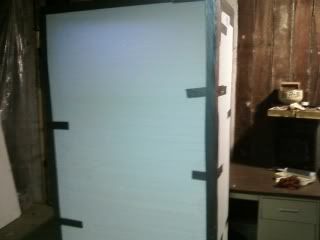
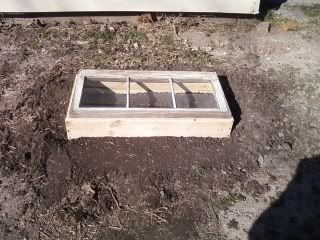
One other thing that I got done was I built my first cold frame and set it out. I planted just two short rows of iceberg lettuce in it since it was kinda small. It is only about 34 inches by,,well,,I Don't remember. Its small. I was a little off with my measurements so there is a a small gap in one end but I built it with screws so I can take it apart and square it up when I have time. The old window is just sitting on the top of it for now, once I square it up I will hinge the window and create some sort of prop system to prop the window open during warm days.
By the way, that little heater that we bought to use in the plant incubator didn't work out. It would cut off at the right temperature but would not come back on. I think that it was getting over heated in there. We put one of our bigger heaters in there that just has a dial and a high low button on it. I found a better thermometer and set the heater on low. Then adjusted the dial until I had around 78 degrees constant. It seems to be working well. There are no seedlings up yet so I hope that the little heater's problem didn't cause me to lose what I planted. I should see something this weekend I hope.
Things to look forward to? I was at a hospital auxiliary book sale last weekend and found the cook book section right off. They had a sale on Hardbacks for a dollar and after 3 P.M. they were half off so I got a mess of them for fifty cents. I bought a bunch of cook books there. I am mostly into the older ones from the fifties and sixties along with anything older. I have some great ones now from that sale. Look for some cool stuff from that as soon as I get time to go through them. I'll get to it sooner or later, remember that I am an over the road truck driver trapped in this occupation and have to drive to make a living. I'll someday be out of this truck and into the kitchen full time but until then trucking is eating up all my time. Stay tuned.
Tim
Showing posts with label Garden. Show all posts
Tuesday, February 28, 2012
Tuesday, February 21, 2012
Our Plant Incubator
Well I got the plant incubator done this past weekend, it turned out pretty good for a thrown together idea. Here is what I started with.This is a picture of a three shelf set, what I ended up using was a four shelf set as the three shelf one had curved shelves in the front and would have caused some major modifications to the Styrofoam.
I cut the Styrofoam to fit the back of the shelves then the sides, all were attached to the shelves with duct tape. In future designs I intend to come up with a more permanent solution possibly using screws and washers. But for now this will work. I cut another sheet to make the door and used about a half a roll of tape to hinge the thing. Again in the future I intend to frame out the door so I can hing it properly. But for now it will serve it's purpose for this season's garden.
It is just latched by two doubled pieces of tape with small screwdrivers jammed into the side for now, again, another design for closing it is rolling around in my head. The light is a grow light from Wal-Mart that cost around ten dollars, there is an outlet bar zip tied to one side that it plugs into. This weekend i am going to add another light for the second shelf. At the moment I don't have the light on as the seeds are not up yet.
we bought this little heater at Wally World for about seventeen bucks, it is wonderful as it has a thermostatic setup on it where you can set it for 65, 70, 75, or 80 degrees. I have it set for 70 degrees and when you open the door you get blasted with a wave of heat. This Incubator works great! The light and the wires from it as well as the heater are all zip tied in place.
This is the first tray of seeds that I put in it. You can see the .99 cent thermometer on the back wall, also from wally World. I have about 6 varieties of Tomato's, about five Varieties of Peppers, some Cabbage, Broccoli and Brussel Sprouts and God know what else started in this one.
More seeds started here. I later had to put some plastic over this one as the heater was sucking up all the moisture. there is some types of Romain started in here and some Squash as well.
Here it is all sealed up. I cut a vent in the bottom of the left side, it is about a three inch by three inch square, there is another one on the same side up top. It vents very well, the heater works great. I need to add one thing next weekend, I need to put a piece of plywood on half the shelf over the heater to protect it from any moisture dripping from the plants after they are up. I'll show you a better view of that after next weekend. It may be rudimentary but it works like a charm.
Labels:
Bedding Plants,
Garden,
Nursery,
Plant incubator,
Plants
Thursday, February 16, 2012
Starting Plants For The Garden
Here is just an update of sorts, we have had our own kitchen garden ever since we moved north to Illinois and this year will be no different. I attempted to build a plastic room about the size of a large shower stall out in the garage to heat and start our garden plants in but I think that the plastic was way too thin because the small heater that runs us out of our computer/sewing room couldn't heat that plastic room higher than 30 degrees when the outside temp was 22. I took pictures of it but after it was determined to be a total failure I decided not to post them. Epic Fail!
Plan B was for me to build a couple of smaller desktop insulated boxes with a light inside along with a vent fan connected to an attic fan thermostat. My thoughts were that the florescent lights could heat the thing and grow the plants and the thermostatic fan could cool it down if it got too hot. I thought about something that I see at work and changed to plan C.
We go down to Florida from time to time and reload down there with frozen orange juice. sometimes on the same load we load "Cooler" juice that is not to be frozen so we have to buy these 4 x 8 sheets of 2 inch thick Styrofoam bulkheads to separate the freezer stuff in the nose of the trailer from the cooler stuff in the rear. Usually we toss this stuff in the trash first chance we get after unloading because it is in the way. But sometimes those trailers end up at our yard and have to be cleaned out. I called the boss yesterday to ask what they did with those panels, if they threw them out or saved them for future use? It just so happens that they have a few of them on hand in the warehouse and I am welcome to some of them.
Here is plan C. I have some stackable shelves out in the garage, you know the type that has black plastic shelves with gray or black plastic tubes in the corners to add more shelves? I have two sets of those in the garage and I plan to take whichever set has the most distance between shelves and encase it with these Styrofoam sheets on three sides and the top. I will then create an insulted front door or doors that can be opened to check the plants inside. We bought a heater that has its own thermostat so we can set it for 70 degrees inside so there won't be much of a need for a cooling fan. Walmart has encased under cabinet grow lights for about $20 or I could use the curly cue screw in types with some existing light fixtures I already have. At any rate there is going to be some seeds started for the Crimson Kitchen's, kitchen garden this weekend.
If I find that it gets too hot inside due to the weird winter we are having I have an attic fan thermostat up in the attic, all I need to do is make sure that it still works and find a small fan to vent to upper level of the plant incubator. I will take some pictures of this contraption as I'm making it so I will be able to post some later. These sheets of Styrofoam are a blessing, they cost around $20.00 if you had to buy them from the hardware store. some of the plants that we are going to start are green peppers, yellow peppers, sweet red peppers, Jalapenos, Anaheim chili's, about 6 varieties of Tomato's, some Broccoli, cabbage, and whatever I might have forgot. If this incubator turns out the way I think it is, it should hold about 100 plants. This warm winter has me wanting to till the garden right now. I hope that it doesn't smack us in the face this March since it has been relatively calm so far. More late after I get this project started.
TIM
Tuesday, June 30, 2009
Garden, Fried Foods, Goodbye Job and Hello Peace.
Some garden photos!
We had a nice weekend. We ate entirely too much! Friday night Tim fried some fresh zuchinni to go with some orange marinade chicken he grilled. Delicious. Sunday afternoon we had homemade fried onion rings. Oh my, they were too good and I ate too much. That is the most fried food we have eaten in so long. 

I will get some crafting pictures to share. I have been trying my hand at embroidery and I am loving it. I had fun working on some granny squares with some scrap yarn.
When we moved from Alabama I left behind a really good job. I was an Executive Administrative Assistant for various VPs in the Defense and Aerospace industry. I had a 40 to 45 minute commute in traffic that could make even the best of folks cuss like a sailor. I learned when you got that promotion working with VPs that your job was directly related to them....so if they decide to leave or change positions you are left working to figure out where you stay or go. I got so tired of that. I hate to complain because the Good Lord took such good care of me and my family with that job and the insurance it provided. Plus I worked with some of the best people and friends of my adult life. I moved up quickly and that job was a true blessing. But it seem to just run it's season and I had no problems leaving it behind. My health problems added to this as well.
I knew I was stressed, but just recently I realized just how stressed. Days like today are gifts to me. I accomplish my tasks at a comfortable pace. And no more traffic! This move has had some problems and things we didn't plan, but I am so thankful to be here. Tim's family is the biggest blessing. I am an only child and Tim has 4 sisters! They are fun and hilarious with some of the cutest kids you can find. Tim's Mom and Dad are like my parents and treat me like one of their own. Tim's daughter, Lucy, is a sweetheart and I love being able to get to know her better. Tim is always thanking me for wanting to move "home". But I want to thank him for helping me find a new home.
I love this little old house and I love, love the huge shade trees in the front yard. and we are seeing light at the end of the tunnel as far as remodeling goes. I just need to remember how blessed I feel on these days that are so peaceful. I would like to find a part time job. But right now I couldn't imagine having to support a VP no matter how much money they paid me.
I hope your Tuesday is a peaceful as mine today.
Kim
Monday, May 25, 2009
Garden Pictures
Well, this weekend we finally got the garden weeded, tilled again, and planted. The shot below is of the water tower a block from our house. It was getting ready to storm and I thought the contrast was perfect for a picture.

Here is a shot of our bush beans that are coming up. We planted four rows of them.

We have one lonely eggplant.


Here is a shot of our bush beans that are coming up. We planted four rows of them.

We have one lonely eggplant.

This is Flat Leaf Parsley, Basil, and Watermelon in the background. I intend to put a chickenwire fence around the Watermelon after it gets running to keep it penned in and under control.
We have eleven Pepper plants, California Wonders and Some Yellow Bells.
This is Zuchini in the foreground and Cucumbers in the background. The Cucumbers I intend to build a verticle lattice fence that they can climb on.


This is our thirteen tomato plants. We have Better Boys, Jet Stars, Early Girls, One Roma, and about three cherry.
Last here is our four rows of corn. Its the Yellow and White Variety.
Here is the whole garden shot. We started to see some rabbit encroachment so after I shot this, and while it was raining I cut a 50 foot roll of Two foot chicken wire down the middle using some tin snips to make 100 foot of one foot rabbit fence. If they decide to jump it,,,,well I hate it for them if they are still in there in the morning!


Wednesday, May 20, 2009
Garden Update
This afternoon I had some time at home due to a meeting and actually had time to work in the garden. I have yet to get the tiller fixed so I turned some soil the old fashioned way, I used a shovel. I sowed four rows of bush beans about ten feet long. Kim planted some Hostas next to the house and the garage, along with some flowers. I started weeding the corn and let me tell you, that is a lot of work. I am having to do most of it on my hands and knees so I wont rip out any more corn plants. Yea, I got two of them as soon as I got started with the hoe. This Friday is payday so I will have the funds to buy some more chicken wire. It seems that the local cottontails are enjoying a corn treat at night. I guess I will use the chicken wire to surround the whole garden until we can get the permanent fence up. I understand that if you are farming and rabbits are eating your crop, they can be considered a varmint and shot. I wonder if that works in town?
Saturday, May 16, 2009
Tiller Work
I didn't get a whole lot done in the house this weekend, we have company so I wasn't in the mood for the whole painting thing. My step son Nick has been here for a week and he is heading back to college this weekend. I did get the gutters cleaned out though. I got four wheel barrows of crap out of them. They were full of dirt, leaves and maple tree saplings. It looked like they hadn't been emptied for a couple of years.
I had time this afternoon to tinker with my tiller a bit. I pulled the gas tank off of it and poured about a quart and a half of really orange gas out of it. It had this sick, sweet smell to it. It seemed like it had been sitting in there for a season or two. I had to clean up the carb a bit and work on the pull starter, but after I got through it started on the second pull! The bearings are going bad in the pull starter and it needs a gasket between the tank and the carb but those are minor. The pull starter shaft is an easy fix if I can find a place around here that has briggs and stratton parts. When I grew up here there were a couple of places that repaired small engines but now I cant find any. I'm sure that after a little research I'll find a place.
No garden update this time, it has rained here more that three times a week lately so I still have not been able to get any seeds planted. I have maple trees sprouting up all over the unplanted section but its too muddy to deal with it. Soon,,,,Soon.....
Saturday, May 9, 2009
Great Garden Find!!
This weekend we got the tomato plants and the peppers planted, along with some flat leaf parsley and some basil. I had to buy some chicken wire and dowel rods to keep the rabbits out of them until I get the real garden fence put in. I just cut chicken wire into little round fences and shoved the dowel rods through them into the ground holding them in place. I see a lot of people around here using buckets or coffee cans with the bottoms cut out of them but I had none of those items. I hope this works because it was getting dark as I finished the last one and was being watched by two huge rabbits in the neighbors yard. I thought that I heard the "Mission Impossible" theme in the background.
Oh yea! The "Great Garden Find"?
We went to an auction at our local auction house and I found this old Tiller. I think it is a "Yardman Earth Bird". I waited all day for them to get to this tiller. I think that it was three items from last. I got it for $40 bucks! I talked to the man that owned it and he said that he used it last year and it ran fine. Me and my dad tried to start it after we got it home but it wouldn't run. I think that it has old gas in it. What a find that was! This will be my little weekend project soon. I think with a little fresh gas and a carb cleanup and a new spark plug, this old bird will be tearing up earth again.
I will get pictures of some of the other stuff we scored later and get some pictures up of our sweet corn that is over four inches tall already. I'm back on the road early this weekend so I doubt that I will have time to post them.
Peace
Tim
Saturday, April 25, 2009
Yea! We Got The Garden Tilled!
We finally got the garden tilled. My sister told me weeks ago that she had a tiller but when she told me that it was a "Mantis" I had to look it up on line and see what she had. It was way to small for a garden that had never been tilled before. Long story short, I called the local farm equipment store and found someone with a nice troy-built to do it for $40. It took him the better part of an hour and a half to bust it up good. We are going to sow some seeds tomorrow so stay tuned for something on that. Look at the photo below and picture in your mind a white picket fence around that garden with a gate centered in the foreground. That will be coming in the next couple weeks. Then we will be able to plant tomato plants, peppers and anything else that rabbits might get before the fence goes up.
Sunday, March 29, 2009
Well, I woke up this morning and this is what I saw. It is just a dusting and not the 1-4 inches they said we might get. I am happy with this as I was more than ready for spring. It is going to be in the 40's today so this is melting as I write this.


Below you see the huge, old garage that came with this property. Between me and the garage you see a small sidewalk forming a square. Inside that square is where we are going to put our garden. We are going to set six 4x4 posts to start. Four corners and two for a gate in the foreground. I am going to put in a normal 48 inch chain link fence gate. At first we are going to fence it in with some wire fencing and steel posts where needed. Later it will get an all white picket fence. With all the stuff that I need to do in the house I can't justify doing more in the garden this season. At least we are going to have one so I can can vegetables this year. My sister has a mantis tiller but it is in the shop at the moment. Hopefully it will be fixed and I can till this up soon.
Subscribe to:
Posts (Atom)